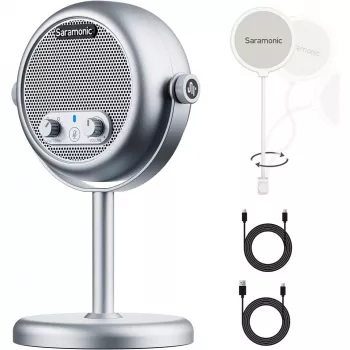
Retro USB Condenser Mic for Streaming, Calls & Podcasts
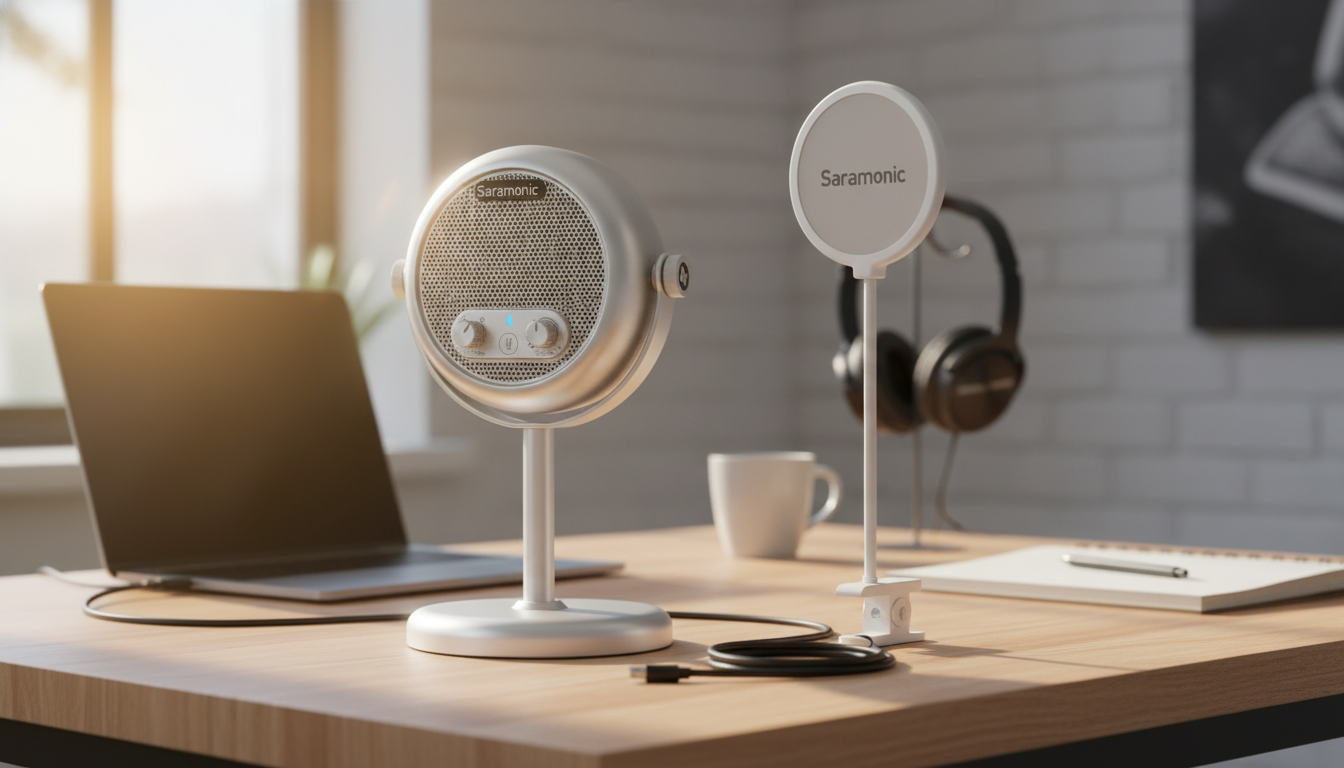
Vintage Style USB Condenser Microphone for Desktop Streaming & Recording
A desktop microphone should be simple to plug in, easy to position, and consistent in the way it captures speech and vocals. This vintage-style USB condenser microphone pairs a classic broadcast-inspired look with modern USB convenience for streaming, voice chat, podcasts, and quick music demos—without the extra steps of an audio interface. For creators who want a cleaner, more present voice than a laptop mic can deliver, a desk-ready condenser can be one of the fastest upgrades to day-to-day audio.
What Makes a Vintage-Style USB Condenser Mic Different
While many USB microphones aim for a modern, minimalist look, a vintage-style condenser leans into a classic studio/broadcast aesthetic—think old-school grille lines and a statement silhouette that looks at home on camera. Beyond appearance, the practical differences matter:
- Vintage-inspired housing and grille aimed at a classic studio/broadcast aesthetic for a desk setup
- USB connection designed for direct use with a computer, keeping the signal path simple
- Condenser-style sensitivity suited to spoken voice detail, narration, and singing at close range
- Desktop-friendly form factor intended to stay within arm’s reach for quick adjustments
If you’re new to mic types, it helps to understand where condensers fit in typical home and desktop workflows. Audio-Technica’s overview of microphone basics is a solid starting point for comparing common designs and use cases.
Best Uses: Streaming, Meetings, Podcasts, and Light Music Work
A USB condenser microphone is at its best when it can live on the desk, stay close to the speaker, and capture a consistent tone session after session. That makes it a strong match for:
- Live streaming: clearer voice presence than typical laptop mics when placed close and aimed correctly
- Podcasts and narration: steady tone for spoken-word when paired with good mic distance and room control
- Video calls: improved intelligibility for remote work, interviews, and online classes
- Music demos: useful for capturing vocals or acoustic instruments in a simple home setup
- Content creation: a visual upgrade for on-camera desk shots thanks to the retro look
For many setups, the most noticeable improvement comes from reducing “roomy” sound and getting the microphone closer—without overdoing gain. A vintage-style USB mic can look like a centerpiece, but it performs best as a working tool positioned with intent.
Sound Fundamentals That Improve Results Immediately
Great audio usually comes from small, repeatable habits. Before adding any heavy software processing, get these fundamentals right:
- Distance: start around 6–10 inches from the mic for a natural balance of fullness and clarity
- Angle: speak slightly off-axis (a bit to the side) to reduce harsh “P” and “S” bursts
- Room control: soft furnishings, rugs, and curtains reduce echo that no microphone can fully remove
- Input level: set gain so peaks stay clean; avoid clipping by testing loud words before recording
- Monitoring: if supported by the setup, listen back to confirm noise levels and room reflections
For a deeper look at placement, proximity effect, and practical mic technique, Shure’s guide to microphone techniques offers broadly applicable tips.
Quick Setup Checklist (Fast Improvements)
| Step | What to Do | Why It Helps |
|---|---|---|
| Placement | Keep the mic close and slightly off to the side of the mouth | Reduces plosives while keeping a full voice tone |
| Room | Record away from bare walls; add soft items nearby | Cuts echo and boxy reflections |
| Levels | Test a loud phrase and lower input if it distorts | Prevents clipping that ruins takes |
| Consistency | Mark a spot for the stand and keep posture similar | Makes tone consistent across sessions |
Design and Desk Practicality
A microphone that stays out is a microphone that gets used. The retro-styled silhouette is meant to complement minimalist or vintage desk aesthetics, but the bigger win is daily usability:
- Stable positioning helps keep voice tone consistent during long sessions
- A dedicated desktop mic can reduce keyboard and desk vibration pickup when positioned carefully
- Cable routing matters: keep the USB cable away from power bricks and tangles to reduce handling noise and clutter
For extra steadiness, set the mic so it isn’t directly between your hands and your keyboard. Even a small shift to the side can reduce incidental bumps while keeping the capsule close to your speaking position.
Compatibility and Everyday Workflow
If a computer doesn’t “see” the mic or the wrong input is selected, Microsoft’s troubleshooting steps for fixing microphone problems in Windows can help you confirm device selection and permissions.
Getting a Warm, “Broadcast” Voice Without Overprocessing
Care, Handling, and Longevity
Product Options
- Vintage Style USB Condenser Microphone for Desktop Streaming & Recording — a desk-friendly, USB-ready microphone with a classic look for creators and remote work setups.
- The Cozy Corner That Changes Mornings: Ultimate Breakfast Nook with Banquette Seating Guide — a practical guide for building a comfortable corner at home, useful if you’re upgrading the room where you record or take calls.
FAQ
Does a USB condenser microphone work for streaming and video calls without extra equipment?
Yes. A USB condenser mic typically plugs directly into your computer, then you select it as the input device in your operating system and inside your streaming or conferencing app. In most setups, no separate audio interface is required.
How far should the microphone be from the mouth for clear voice recording?
Start around 6–10 inches away and speak slightly off-axis so bursts of air don’t hit the capsule directly. Then adjust closer for more warmth or slightly farther if you hear plosives, breath noise, or too much low-end buildup.
Why does my recording sound echoey even with a better microphone?
Echo usually comes from room reflections off hard walls, ceilings, and floors, especially when the mic is too far from your mouth. Move closer to the mic, reduce gain accordingly, and add soft materials (curtains, rugs, or a blanket nearby) to absorb reflections.


Leave a comment